I wanted to share how I managed to change the sprites for QStar 1. Full credit to Andrew, as his work has been invaluable for me to better understand how to do sprites.
I was working on creating Asterix and Obelix sprites for an animation I was planning to create for a 2024 Christmas card. Since my last Christmas card was based off of Andrew's method, I decided to change his QStar 1 sprites to see my animation through his code. I had to shrink the sprites to fit into QStar 1 and create them for all directions.
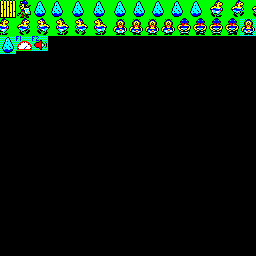
I used Paint in Windows, max'ed at 800% focus. The image here is what it looked like though it has been enlarged 800% (i.e. if you max focus in paint at 800%, pixels are still the square size, just easier to see -- have to download to see what I mean).
I used the first three rows of large icons of Obelix and the Roman Soldier as templates. I got these sprites off of Sega's various Asterix games (The Great Rescue, Power of the Gods). I saved them in 16-bit bmp format and only had to re-color the skin tone from grey to yellow. You'll note that I didn't have an authentic sprite of Obelix walking forward, so I created it with pasting his face on top of his torso walking backwards...that's why the feet look funky. Also note that I stuck with Obelix having his two arms folded behind his back for all directions since he walks that way frequently in the comics.
Here is the actual file at normal size.
I then flattened out the new icons and used paint.net to generate a 100% jpeg file (i.e. no compression to avoid artifacts).
- sprites.jpg (43.98 KiB) Viewed 4182 times
Then I wrote some code that uses photon to convert to a screen file, and then step through it to generate Andrew's format. I first thought about doing this in Windows (maybe using Python), but the QL, with SuperBASIC, makes this so easy, especially since the screen file format is raw with no header.
Code: Select all
10 REMark Convert screen file to sprites
15 EW win1_photon;"win1_sprites_jpg\m8\d0\r"
20 DELETE win1_sprites_tmp
25 SBYTES win1_sprites_tmp,131072,6912
30 src=RESPR(6912):LBYTES win1_sprites_tmp,src:
35 dest=RESPR(4992): pos=0: ptr=dest
40 :
45 FOR i=1 TO 3: scrToSprite 16,18
50 FOR i=1 TO 16: scrToSprite 20,18
55 FOR i=1 TO 10: scrToSprite 16,18
60 FOR i=1 TO 2: scrToSprite 16,15
65 :
70 DELETE win1_sprites_dat
75 SBYTES win1_sprites_dat,dest,4992
80 MODE 8: LBYTES win1_sprites_dat,131072
85 STOP
90 :
95 DEFine PROCedure scrToSprite (col, row)
100   LOCal i, j, k, l, blk
105   PRINT #0,"Processing sprite: ";row;",";col
110   FOR i=1 TO row
115     l=pos: blk=0
120     FOR j=1 TO (col/2)
125       IF l=128 THEN blk=2176: l=0
130       k=src+(i-1)*128+(j-1)+blk
135       POKE ptr, PEEK (k)
140       ptr=ptr+1: l=l+1
145     NEXT j
150   NEXT i
155   src=src+(col/2)+blk: pos=l
160 END DEFine scrToSprite
Here is a small routine I wrote that allowed me to unwind the sprite_dat file into images so I could check how mine looked (helped me debug the above code).
Code: Select all
10 INPUT "Enter sprite filename: ";f$
15 src=RESPR(4992): LBYTES f$,src
20 MODE 8: dst=131072: src=src+1872
25 FOR i=1TO 8
30   FOR j=1 TO 18
35      FOR k=1 TO 10
40         POKE dst+(k-1),PEEK (src)
45         src=src+1
50      NEXT k
55      dst=dst+128
60    NEXT j
65  NEXT i